Page
Connect the back end to the front end using environment variables
In Part 1 of this learning path, you've started on the Developer Sandbox. You downloaded an application, deployed it to OpenShift, and verified that the front end is working. We'll complete the application in Parts 2 and 3 of this learning path. Now it's time to deploy the back end and connect it to the front end using environment variables, then add a health check.
Deploy the Node.js back end
In the first part of this lab, you created a Dockerfile, built a JavaScript front-end container, and pushed it to a shared registry so it could be used by OpenShift.
OpenShift has several built-in options for application deployment. You will build and deploy a Node.js back end using OpenShift's Source-to-Image (S2I) toolkit.
Build the Node.js back end using S2I
Source-to-Image is a toolkit for building containers directly from the source code. To build the Node.js back end from the GitHub source code, you can use the oc new-app command, which you used in Part 1. This time, you must specify the GitHub repository where the source code is located; OpenShift will automatically pick the correct build image (Node.js 16 at this time). The --context-dir parameter specifies that the source code is located in the /back folder:
oc new-app https://github.com/nodeshift-blog-examples/urlshortener --context-dir=back
You should get a message back indicating that a build has started:
--> Found image dfd08e2 (2 months old) in image stream "openshift/nodejs" under tag "16-ubi8" for "nodejs"

    Node.js 16
    ----------
    Node.js 16 available as container is a base platform for building and running various Node.js 16 applications and frameworks. Node.js is a platform built on Chrome's JavaScript runtime for easily building fast, scalable network applications. Node.js uses an event-driven, non-blocking I/O model that makes it lightweight and efficient, perfect for data-intensive real-time applications that run across distributed devices.

    Tags: builder, nodejs, nodejs16

    * The source repository appears to match: nodejs
    * A source build using source code from https://github.com/nodeshift-blog-examples/urlshortener will be created
      * The resulting image will be pushed to image stream tag "urlshortener:latest"
      * Use 'oc start-build' to trigger a new build

--> Creating resources ...
    imagestream.image.openshift.io "urlshortener" created
    buildconfig.build.openshift.io "urlshortener" created
    deployment.apps "urlshortener" created
    service "urlshortener" created
--> Success
    Build scheduled, use 'oc logs -f buildconfig/urlshortener' to track its progress.
    Application is not exposed. You can expose services to the outside world by executing one or more of the commands below:
     'oc expose service/urlshortener'
    Run 'oc status' to view your app.
If you head to the Topology view in the OpenShift console as shown in Figure 6, you can see that the application is displayed with a white ring around it. This ring indicates that the application is currently being built. The source code is cloned, and the image is built directly on the OpenShift cluster.

In a few minutes, you should see the ring turn blue, indicating that the image was successfully built.
Configure the environment variables
For the purpose of this lab, you'll use environment variables to indicate parameters in the back-end application. In the production server, you might want to change some of the environment variables.
We'll focus here on the back-end application's network port. The Node.js application was running on port 3001 in the development environment, which was set as an environment variable. In this case, you will change the port to 8080.
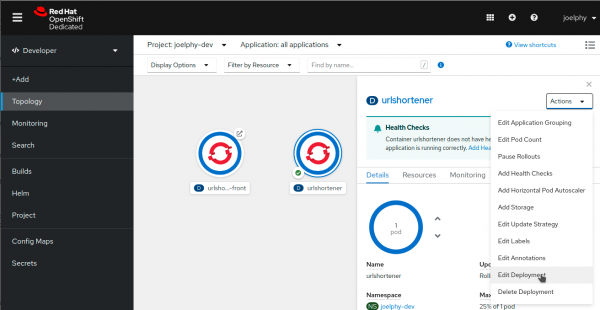
Click on the urlshortener circle denoting your application, and a side panel will open, as shown in Figure 7. In this panel, find the Actions menu in the top right corner and select Edit Deployment.
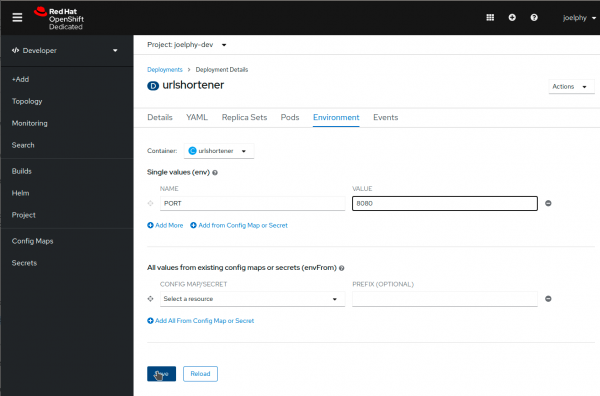
A form-based deployment editor is then displayed, where you can see the description of the URL shortener application deployment. Scroll down the page and find the Environment section. Add a single variable with the name PORT and the value 8080, as shown in Figure 8.
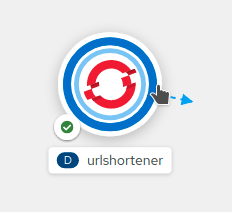
Click Save and go back to the OpenShift Topology view. If you go back fast enough, you might see a double ring around the URL shortener application, as shown in Figure 9. This is because OpenShift is currently deploying a new version of the application with the new environment variables. Once this new version is up and running, OpenShift takes the old version down. This process ensures that there is zero downtime when you update your applications.
Expose the application
Now that you've deployed the application back end, you can expose it using the same command you used for the front end:
oc expose svc/urlshortener
There is no need to specify the port in this case because S2I assumed that the application would be running on port 8080.
If you click on the Open URL link, you should see a response back from the server:
{ "msg": "Hello" }
You can also try the /health route, which should return the server and database status:
{ "server": true, "database": false }
You can see the code for this /health route in the urlshortener express server.
Add a health check
OpenShift can periodically check your pod to see whether it is still running. This process is called a health check. In the side panel, when you clicked on the urlshortener deployment, you might have noticed a message recommending that you add health checks. Go ahead and click on Add Health Checks, shown in Figure 5.

From the next screen, you can add a liveness probe, which is a health check that monitors your application by doing periodic calls to the specified route. As long as the route returns a 200 HTTP code, OpenShift assumes that the application is still running.
To add this health check, click Add Liveness Probe. Change the path to /health and keep all the other default values.
Click the checkmark at the bottom of the dashed area, and then click the blue Add button to save the health check.
If you want to validate that the probe is working, visit the Resources tab from the deployment side-panel and click on View logs next to the pod name. This screen shows you the pod logs, and you should see the request to /health every 10 seconds.
Link the front end and back end
Now that the back end is up and running, you can test the application's About page again. If you open the developer tools in your browser and look at the network requests, you'll notice that some requests are made to %SERVER_NAME%/$BASE_URL/health. That is because the front end currently doesn’t have a value for the $BASE_URL environment variable.
Note: To learn more about how the front-end container injects environment variables in the JavaScript code, see Making environment variables accessible in front-end containers.
Add the BASE_URL environment variable
You can add environment variables using the oc CLI tool, but before you do that, you need to find the BASE_URL that the front-end needs to connect to. This base URL is the route to your back end. You can find this route by running the get route command:
oc get route urlshortener

NAME           HOST/PORT                                                         PATH   SERVICES       PORT       TERMINATION   WILDCARD
urlshortener   urlshortener-joelphy-dev.apps.sandbox.x8i5.p1.openshiftapps.com          urlshortener   8080-tcp                 None
If you want to get only the actual route:
Bash:
You can use awk to extract it:
oc get route urlshortener | awk 'NR>1 {print $2}'
PowerShell:
(oc get route urlshortener -o json | ConvertFrom-Json).spec.host
Now that you know how to get the URL, you can set it as an environment variable for the urlshortener-front deployment by using the set env command with oc. Give it the environment variable name and the value of the route. Don’t forget to prepend http:// to the route:
Bash:
oc set env deployment/urlshortener-front BASE_URL=http://$(oc get route urlshortener | awk 'NR>1 {print $2}')
deployment.apps/urlshortener-front updated
PowerShell:
oc set env deployment/urlshortener-front BASE_URL=http://$((oc get route urlshortener -o json | ConvertFrom-Json).spec.host)
Now that you have configured the BASE_URL environment variable, you can go back to the URL shortener application and check its About page again. Figure 6 shows the current service status on the About page.
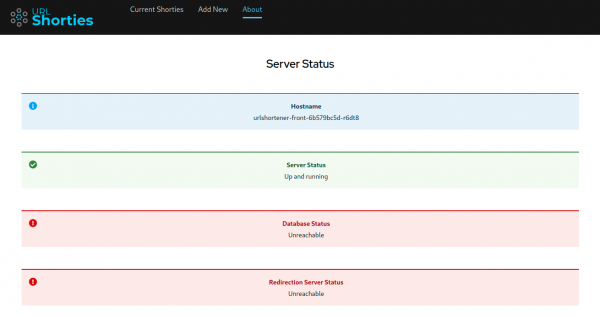
You can see that the server is now up and running.
Conclusion to Lesson 2
The database and redirector services are still unreachable because you have not yet deployed them. You will add those in the third and final lesson of this learning path.
